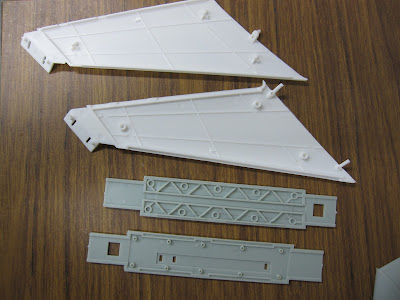
This build will go over the struts/pylons which hold up the Warp Nacelles. My original intention was to have the neck and saucer completed first and write about that but there have been many complications. So I present one of the 12 subassemblies as according to the instructions.
NACELLE STRUTS
Again, the design of the team who made the 1/350 USS Enterprise from the Original Series (TOS), are to be commended. That said, when comparing the struts, side-by-side, and the TOS nacelles are slightly longer, and bigger, I'm not too worried about the three tiny pins on the nacelles vs. the beefy peg on the TOS strut.
This is the first kit of the Constitution Class Refit to get this right in terms of a solid connection between strut and secondary hull. The secondary hull side and top panels 'trap' the pylon tab, making a sturdy connection.
 |
| ERTL kit on left, Polar Lights on right. |
 |
| yeah, that will hold...LMFAO!! |
The struts/pylons interlock with the sides of the secondary hull. The original release of the kit instructs you to glue the struts to the top portion of the fuselage.
Both the structures for each 1/350 scale Enterprise (Refit/TOS) are hollow inside. The Refit nacelles are also much lighter than the TOS nacelles, sagging should be less of an issue as the nacelles are very light-weight.
On this build, one of the downsides of using spray/rattle can primers is, the can sometimes sputter, especially when two different paints come into contact with each other. So far I've been able to re-sand the part and move on as most of this model is smooth. The struts have details, though. I had to make all of the little parallelogram shapes on aft side of the starboard nacelle pylon. Very meticulous.
Once built the next step has been to paint the multiple colours on these parts. While I'm at it, I'm also painting my 1/1000 build too - same colours, same parts.
Here are both pylons and neck mounted the dorsal section of the Secondary Hull for fit reasons.
Here are the nacelle pylons mocked up with the unfinished saucer and an unpainted nacelle.
LIGHTING
Although, technically this part isn't lit (well it is from the secondary hull - later build update), the pylons carry power to the pylons, much like the fictional spacecraft. In this case, sanding out a trench on either side of the pylon inside halves is the key.
Like the saucer halves, I'm using connector cables to connect the nacelles. In a perfect world, I'd like to be able to detach the nacelles for ease of transportation. Lightblocking and stability will determine this though.
Afterwards, I glued up the two halves, painted and masked the insets and used red putty on the seams.
Upon reflection, I felt the trench cover for the matter/anti-matter shaft (the grey line down the length of the pylon) was too dark, so I lightened it dusting over white primer.
Here are the final results from all of the paint. The white is actually a 'pearl white' by Tamiya.
And the aft edge and leading edge of the nacelle pylons.
This is a short update but I feel when I have the time I would rather do more short updates than take ages to do a big one.
These parts now completed have been wrapped up so they don't weather, the pearl white scratches quite easily.
Happy Model building!!


No comments:
Post a Comment