Showing posts with label Saucer. Show all posts

Tuesday, 30 May 2017

Constitution Class Refit USS OLYMPIA Polar Lights 1/350 scale UPDATE #23

Greetings!

This entry is going to cover the remaining wiring to be done to connect the saucer section to the engineering hull.

My first step after testing the saucer's wiring was to get up close and personal with the model.  That also meant taking off the nacelles (which were taped on).


A rats nest of wires.

Once I separated the saucer and neck wires, I wrapped them around the neck.  Then I tested the lighting in the engineering hull.


Once I isolated the saucer's wiring, I then isolated the main wiring to the nacelles.


 Then I retraced my steps, looking for short wires.


The wires which lead to the hangar bay, the blue forcefield (I'm assuming that's what they are) and the the windows (in red) over the hangar deck broke off a long while back.  I had to add a new lead.


Next, I then moved onto hooking up and testing the nav lights.


Once I knew they worked, I moved onto soldering them.


Next, I started to hook up the remaining circuits, starting with the spot lights.  Those are the yellow wires coming out from the front of the fuselage.


And now, spot lights and hangar deck lighting.  Notice how there is a light leak around the secondary hull windows.


Next, the main lights (windows).


At this point, I realized not having the nacelles built presents a problem if there is a break in any wire and I have to re-route the electricity through another source.  So I am not soldering any common wires that are common to the nacelles.  This includes the ground wire, the spot lights, the RCS (reaction control system) thruster.  This a real world term for all space craft as this how a space craft maneuvers.  The space shuttle had it, the Apollo capsules had them, Soyuz capsules, etc.  Even the sci-fi-fi TV show Space 1999 had them on the Eagle Transporter.  I think that will be my next build.

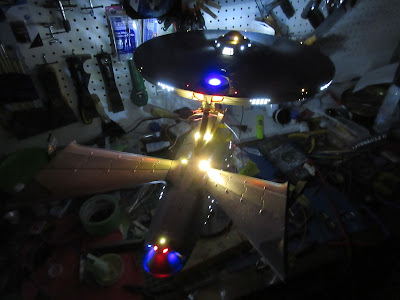
The next set of photos show the various lights on.  Enjoy!

I still can't  locate the wiring for the neck, so I might need to insert some extra LEDs in there.  I haven't wired the main light up for that reason.


Note, the plug for the shuttle bay is in place.


I have now switched the impulse engine to the blue mode.  The Enterprise was depicted with blue engines in Star Trek V: The Final Frontier and some promotional pictures for Star Trek The Motion Picture.   


This shot kind of reminds me of the Enterprise in Star Trek V confronting the 'Great Barrier'.


Next up, build the nacelles and a really good clean-up of the work bench.

Happy model building!!

Star Trek and all related marks, logos and characters are solely owned by CBS Studios Inc. This fan blog (production) is not endorsed by, sponsored by, nor affiliated with CBS, Paramount Pictures, or any other Star Trek franchise, and is a non-commercial fan-made blog intended for recreational use.  No commercial exhibition or distribution is permitted. No alleged independent rights will be asserted against CBS or Paramount Pictures.

Thursday, 25 May 2017

Constitution Class Refit USS OLYMPIA Polar Lights 1/350 scale UPDATE #22

Greetings!

This is just a brief update from some photos I took last night.  For the last 6 weeks, the model has been sitting on my very messy work bench.  The epoxy has clearly hardened and the nacelles are still just taped on for the time being.

Life and work has been beautiful and busy and my next major step is to hook up all the lights from the saucer with lights from the body.  It looks like a rats nest of untamed wires.  That is a big daunting task which I need time to do properly. Before I hook them up, I need to test them.  So here goes the tests on the saucer...


This somehow reminds of seeing the Enterprise in V'ger from Star Trek The Motion Picture

Unfortunately one of the lights at the back of the bridge i burned out.


And now in regular shop lighting...


Can't wait to wire up the whole ship now, and that's next!  This wraps up this brief update.

Happy Model Building!!

Star Trek and all related marks, logos and characters are solely owned by CBS Studios Inc. This fan blog (production) is not endorsed by, sponsored by, nor affiliated with CBS, Paramount Pictures, or any other Star Trek franchise, and is a non-commercial fan-made blog intended for recreational use.  No commercial exhibition or distribution is permitted. No alleged independent rights will be asserted against CBS or Paramount Pictures.

Sunday, 19 February 2017

Constitution Class Refit USS OLYMPIA Polar Lights 1/350 scale UPDATE #19 - Finishing the Saucer: Part 7

Greetings!

This will be the last entry, I promise on this saucer section as a separate entity.

When I last left off, I thought the saucer was basically done (it is, except for those extra details/decals).  I also was not happy with the way the pinstriping around the B/C deck was looking, so I removed it.


I went through one set of decals from one kit regarding the pinstriping, I didn't want to waste a second set, so I decided to use the ones I previously made.  There's a bit of bleed, but it will look consistent.  If there's one type of decal I hate doing, it's pinstriping.  They easily tear.


ELECTRICAL SYSTEM


Since I am finding that the decals tear so easily, I decided now would be a good time to test the lighting system one more time.  From the saucer, there is a main trunk of wiring (9 leads) and a secondary set for the impulse deflection crystal.  The following are pictures from early in the build...

(main wiring from the saucer)
(mains joined together, before sealing the saucer) 
(feeding the wiring through) 
(secondary wires - impulse deflection crystal)
(as installed)
Also in this bundle are the lights for the neck...that plus overspray on the wires makes it difficult to tell which wire does what (also I lost my notes, or they got absorbed in my messy work bench).  So I've had to figure out each wire separately.  I have many black wires (return current), but the switching of the different functions are colour coded.  Red does the main lights, yellow lights the spot lights, green the RCS, etc.  What I couldn't remember was the flashers, so some sleuthing through my pictures and using low voltage  (just in case, everything is resistored to 12V DC), I found them!!


I lit flashing lights surrounding the impulse engine area with red flashers, much like the Reliant is lit in Star Trek II: The Wrath of Khan.  On the studio model, these are warm white or tungsten (probably lit with grain of wheat bulbs, common at the time).


And from below.  Despite my efforts, the green doesn't show as well.  The 'bulbs' are actually hot glue, formed from when I glued the bulbs in place.  Paint doesn't stick well to them, but then again, neither did bits of tape I used.


With a bit more investigation, I found the leads to photon torpedo launchers broke off.  I am going to leave this until I'm ready for final assembly.  I don't want them to break again.


BACK TO DECALS


Placing the pinstripes around the B/C deck for a third time, I took my time.


In the interim, I made more decals, this time, details for the neck and more geometric shapes.


These details are specifically for the neck.


And more pinstripes.  The red hash tags are to go around the innermost ring of the upper saucer.


Then I added the rectangular markings on all of the access panels on the lower saucer.


And seperation markings on the lower docking port doors.  In Star Trek The Motion Picture, both Spock and Kirk emerged from the portside door to gain access to V'Ger in a space walk.  The soundtrack calls it 'Spock Walk'


Here are the red hash tags on the upper saucer.  Just an interesting detail featured on the Reliant, I chose to duplicate here.


I used a pencil to draw in the gridlines, but it tore a few decals.  I was prepared to paste in new ones, but I came up with the idea of using a fine black Sharpie marker to fill in the tears in the decals.


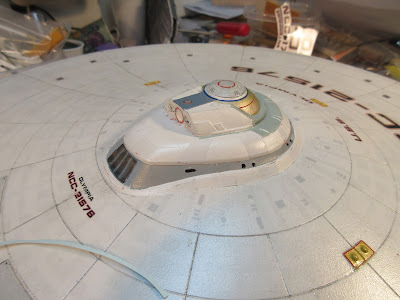
One final detail, I used a sharp pencil to outline the B/C deck to show some weathering and filled in the markings around the bridge with an ultra fine pen.  It just helps to define the recesses.


I have since clear coated this model so the decals won't tear or fall off.  I didn't take a picture of that, or that I added some more geometric shapes to the B/C deck to blend it in to the surrounding area.

That wraps up this entry and more importantly the saucer.  Ready for connection to stardrive section Number One!!

Happy Model Building!

Star Trek and all related marks, logos and characters are solely owned by CBS Studios Inc. This fan blog (production) is not endorsed by, sponsored by, nor affiliated with CBS, Paramount Pictures, or any other Star Trek franchise, and is a non-commercial fan-made blog intended for recreational use.  No commercial exhibition or distribution is permitted. No alleged independent rights will be asserted against CBS or Paramount Pictures.