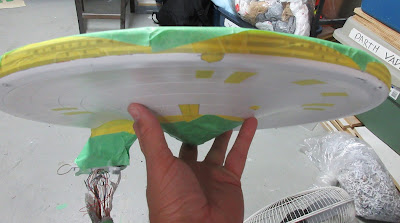
Well, this has been an interesting build to put it mildly. I've had to repaint 90 percent of this model, I've had electronics die on me and broke a piece of the pylon break off on me. C'est la vie!
As I work on the secondary hull to repair the pylon, I figure I will bring you up to speed on the state of the saucer. Here it is as it was back in July:
https://fordosmodels.blogspot.ca/2016/07/constitution-class-refit-polar-lights.html
What I didn't post, or take pictures of was the fact that a rattle can gum up and spray out globs of paint on the underside of the saucer, and of course the dorsal side of the saucer was peppered with black paint. If this was a Star Wars model, it would look cool, but this is a shiny Federation starship from Star Trek. So I masked off the bottom of the saucer where I wanted to protect the paint.
Ready to be repainted...
Although I didn't photograph it, the paint job went well and I was able to move on to painting and fixing details on the B/C deck.
....and fix some scratches as well.
Then while I was applying new masks to the B/C deck, the model slipped out of my hands and fell to the cement floor...insert explicative here!
What that meant was the seam where the lower saucer meets saucer walls, the seam split open around half of the model. So I had to glue it back down.
Once I glued down the saucer, again, I then turned my efforts to fixing the upper saucer's paint finish and repainted it with a light coat of white primer followed by pearl white. I didn't photograph it unfortunately. Once I was done that, my attention then turned to the lower saucer again. The centre of the lower dome's paint had wore down to the bare plastic, so I had to repaint it.
Also, the surface of the lower saucer wasn't entirely smooth, so I sanded it down with steel wool to smooth out the bumps.
In the process of touching up, I also repainted the centre of the lower dome silver with a dusting of pearl white.
Ready to repaint it, again...
All of those extra steps were worth while to get an even coat. But there are still light leaks around the edge of the saucer.
Once I looked at the saucer in the dark, I could then see the light leaks and where to fill them in with red putty.
A bit further refined.
Once I was ready to paint, I applied the window masks, something I should have ordered from the start of this build.
I am only painting the outer most ring/wall of the ship, so I need to mask the inner section.
Both top and bottom. That is the first coat of grey primer which also helps to light block the exterior. Another technique is to use Tulip Black Fabric paint.
Once I finished with the grey coat, onto white primer.
Happy Model Building!
Star Trek and all related marks, logos and characters are solely owned by CBS Studios Inc. This fan blog (production) is not endorsed by, sponsored by, nor affiliated with CBS, Paramount Pictures, or any other Star Trek franchise, and is a non-commercial fan-made blog intended for recreational use. No commercial exhibition or distribution is permitted. No alleged independent rights will be asserted against CBS or Paramount Pictures.


No comments:
Post a Comment