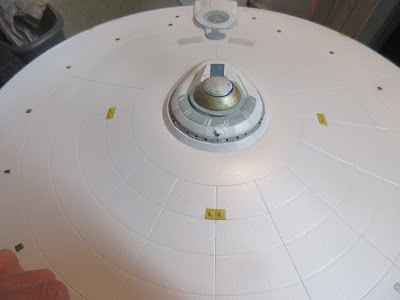
It's finally come to this, finishing the saucer section of the USS Olympia.
Once everything was masked, I then repainted it with pearlescent white.
Next step was to mask off the centre section of the wall so I can retouch the edge. First the top edge.
Followed by the bottom section.
Once I finished repainting the saucer's edge, I then moved on to the RCS thrusters on the saucer.
The phasers and RCS thrusters get painted the same mustard yellow, which is a custom mix of yellow, tan and green.
And here are the results:
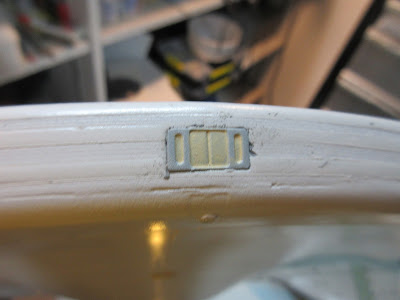
Once I got the yellow applied, and I glued the gangway doors to the port side of the saucer. It was a tricky fit, mostly due to the paint build-up in the opening.
TOUCH-UPS
I mixed together a custom grey to be applied to the lower sensor array and touched up the dome.
I then touched up the saucer where there were some scratches.
I also touched up with a brush the impulse deck and B/C deck.
And around the bridge (A deck).
I've also touched up one of the landing pads which was scratched up.
NECK
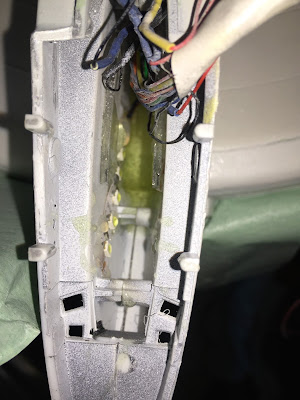
I then had the foresight to reinforce the connection with 15 minute epoxy by dribbling it through the hollow neck along the seams.
I drizzled it down the neck, much like drizzling balsamic vinegar in a salad, except thicker and hot. There is a chemical reaction between the epoxy and the hardener, and that gives off heat.
Which then brought me to another concern, I've busted off the tip from where the neck connects with the secondary hull.
I reinforced this area as well. In future I will use epoxy for major seams.
Next, my attention turned to the hole in the back of the skeg. I previously touched up the back of the impulse engine.
I used Metal Glaze Overcoat to fill the gap, which is fortunately the same colour as the skeg.
It is a 2 part compound.
Next I had to retouch up the 'spine' of the neck.
Which included a small triangle where the neck, which in universe is an explosive bolt which is supposed to separate the saucer from the rest of the ship in emergencies. This has never been seen on screen in the TOS movies, but has been hinted at.
Remaining glassware
I also needed to glue in the lenses for the windows in the neck. I unfortunately lost one of the original pieces, but the kit gives you multiples of certain parts.
Well, technically it's not glass, it's clear plastic, and this piece of plastic is hardly clear any more.
I was able to fashion new window lenses by using other window parts from the kit I haven't used, which are extra. I glued them in place with canopy glue.
As they are clear parts, I need to paint them white first from the back, then light block them. Once I glued them in the model, I scraped the paint off of one side of the larger shape to let light in.
Lighting
I previously made up a wire harness with warm white LEDs. I was able to glue these in to the aperture in the neck, into the roff of the torpedo bay. Here's the effect:This is starting to look very familiar...
Now with the house lights on.
On the underside, I light blocked it with Tulip black fabric paint.
Once I finished the wiring, I made sure everything worked again. I then found the need to lengthen the wires and bind them so they will easily fit through the opening in the secondary hull.
DECALS
In the interim, I've also been working on custom decals. During this process, re-reading the instructions and looking at other builds, I've come to a very important decision about how to continue with this part of the build...I'm going to decal the saucer. This kit comes with hundreds of decals, not to mention I'm doing custom names and markings too. The saucer is such a large disk, it is easier to handle it on its own, vs. having the whole model built and then decalling it. The instructions even recommend this.
On the 1/1000 kit, which I've built one before (USS Excelsior NCC-1718 which has a busted nacelle pylon), and two TOS 1/1000 kits, I've done the saucer separately. As it turns out, for the rehabilitation of the the original 11' USS Enterprise from the the original Star Trek series, the saucer, nacelles and engineering sections were painted separately. It only makes sense as this is a unique shape and it's easier to handle sub assemblies and then bring it together as finished sections. That's what I'm doing here...
I also have a lot of fixing to do on the secondary hull, which I can do in between decalling this part of the model.
One of the parts I customized for this build was the impulse deck. I filled and sanded the detail between the two engines. Also, the engines have a grill that go over them which can be accomplished through the use of a decal...or a brass etched part. Since it's custom, I need to make custom decals then. So I took a mould off of the impulse deck, using a two part silicon putty.
Here's the negative mould.
I then cut up the parts and scanned them in on my laser multifunction centre.
Moving on, I touched up the remaining paint and started to mask off areas of the ship I don't want covered in gloss coat. Gloss coat is necessary for decals to go on properly.
Here it is, the upper saucer gloss coated, ready for decals.
This is going to wrap up this entry. Happy model building!!
Star Trek and all related marks, logos and characters are solely owned by CBS Studios Inc. This fan blog (production) is not endorsed by, sponsored by, nor affiliated with CBS, Paramount Pictures, or any other Star Trek franchise, and is a non-commercial fan-made blog intended for recreational use. No commercial exhibition or distribution is permitted. No alleged independent rights will be asserted against CBS or Paramount Pictures.


No comments:
Post a Comment