Showing posts with label USS Enterprise. Show all posts

Sunday, 20 November 2016

A little treasure - USS Enterprise NCC-1701-A 1/537 scale from Star Trek IV, Star Trek 20th Anniversary Edition

Greetings!

It's been a long while...longer than I expected.  Life is amazing!  Work is amazing!  Model building has taken a backseat, and that's ok, it is a hobby after all.  That said, I'm still plugging away at my 1/350 build which has a name now, "USS Olympia".  A 24th century Constitution Class Starship.

This entry isn't so much a build update but a retro review of a kit, one that came out 30 years ago and something I feel ties into the current Star Trek 50th Anniversary and the new Star Trek film, Star Trek Beyond.

A hobby shop I frequent recently had its 30th anniversary and many specials on all of their kits.  I found a 'Holy Grail', a vintage 1986-87 AMT/Ertl 1:537 scale USS Enterprise NCC-1701-A from Star Trek IV: The Voyage Home.  I couldn't resist it, I bought it!

Star Trek IV: The Voyage Home was released theatrically on November 19, 1986.  

Side box art


'Authentic decals for 1986'


screen shot on the Enterprise-A bridge at the end of Star Trek IV - I always wished this was used in Star Trek V and beyond, but the reality is it was heavily modified for Star Trek The Next Generation as the Battle Bridge.

There were seven editions of these Refit Enterprise kits, each from the first six movies and a 'Light And Sound' Edition which was released between Star Trek V and Star Trek VI.  In each edition there were subtle changes, except from 'The Motion Picture' 'to 'The Wrath of Khan', where the surface of the hull changed from month to this awful random hull plating which is grossly inaccurate and remained in every release of this kit since.  I was privileged to once own a 'smoothie'.  The smoothie kit also didn't have 'phaser bumps' or any detail on the photon torpedo launcher (which is not terribly detailed in the later versions).

Out of the box


The original decal sheet.


The overall condition of the kit is really good.  

Decals


First the decals. This is a very simple decal sheet as what standard at the time.  There's no pinstriping, (other than the Starfleet Pendant which is inaccurate).

Star Trek IV decal sheet on left, Star Trek III on right

Star Trek VI & Star Trek V(used) on left, Polar Ligthts 1/350 on right
Overall, the registry is really good on such an old decal sheet.  Here I compare Star Trek IV vs. Star Trek III sheets.


Star Trek IV - Enterprise-A

Star Trek III - Enterprise-Refit
Other than the registry (NCC-1701 vs. NCC-1701-A), the rest of the decals are the same, reworked. In this case, the same illegible marking for the docking port (sigh).

Star Trek IV

Star Trek III

And of course the Star Trek 20th anniversary commemoration decal...still hard to believe that was 30 years ago...


Differences between the kits


The major difference is stand.

old stand on the left, new one on the right
Apparently, this style of model stand had been a mainstay of AMT from the 60's up until this point in 1986.  The original TOS Enterprise, TOS Klingon Cruiser, Star Trek TMP Vulcan Shuttle, TMP Klingon Cruiser and lastly the Refit Enterprise all used this stand.  It looks 60's-ish.  And that's ok.  I really like it!  The only problem with it in reference to the refit Enterprise is the model is too heavy for it.  The newer stand is quite robust.  The 'light and sound' kit was even bigger and more robust (to make way for the circuitry).

The change in the stand meant a change in secondary hull:

Star Trek III on left, Star Trek IV on right

Star Trek III on top, Star Trek IV below

Here is a composite of both the old and newer hull together.  The slot on the old hull was for a switch.  The original STTMP smoothie version of the kit had a lighting system, which only lit up the saucer windows, bridge and sensor array at the bottom of the saucer.  No blinking lights, secondary hull lighting at all, and the secondary hull was the battery compartment, much like the original Star Trek AMT model released in the 1960's.  This new mounting system allows the ship to be removed from its stand unlike its predecessor where it had to be glued on.
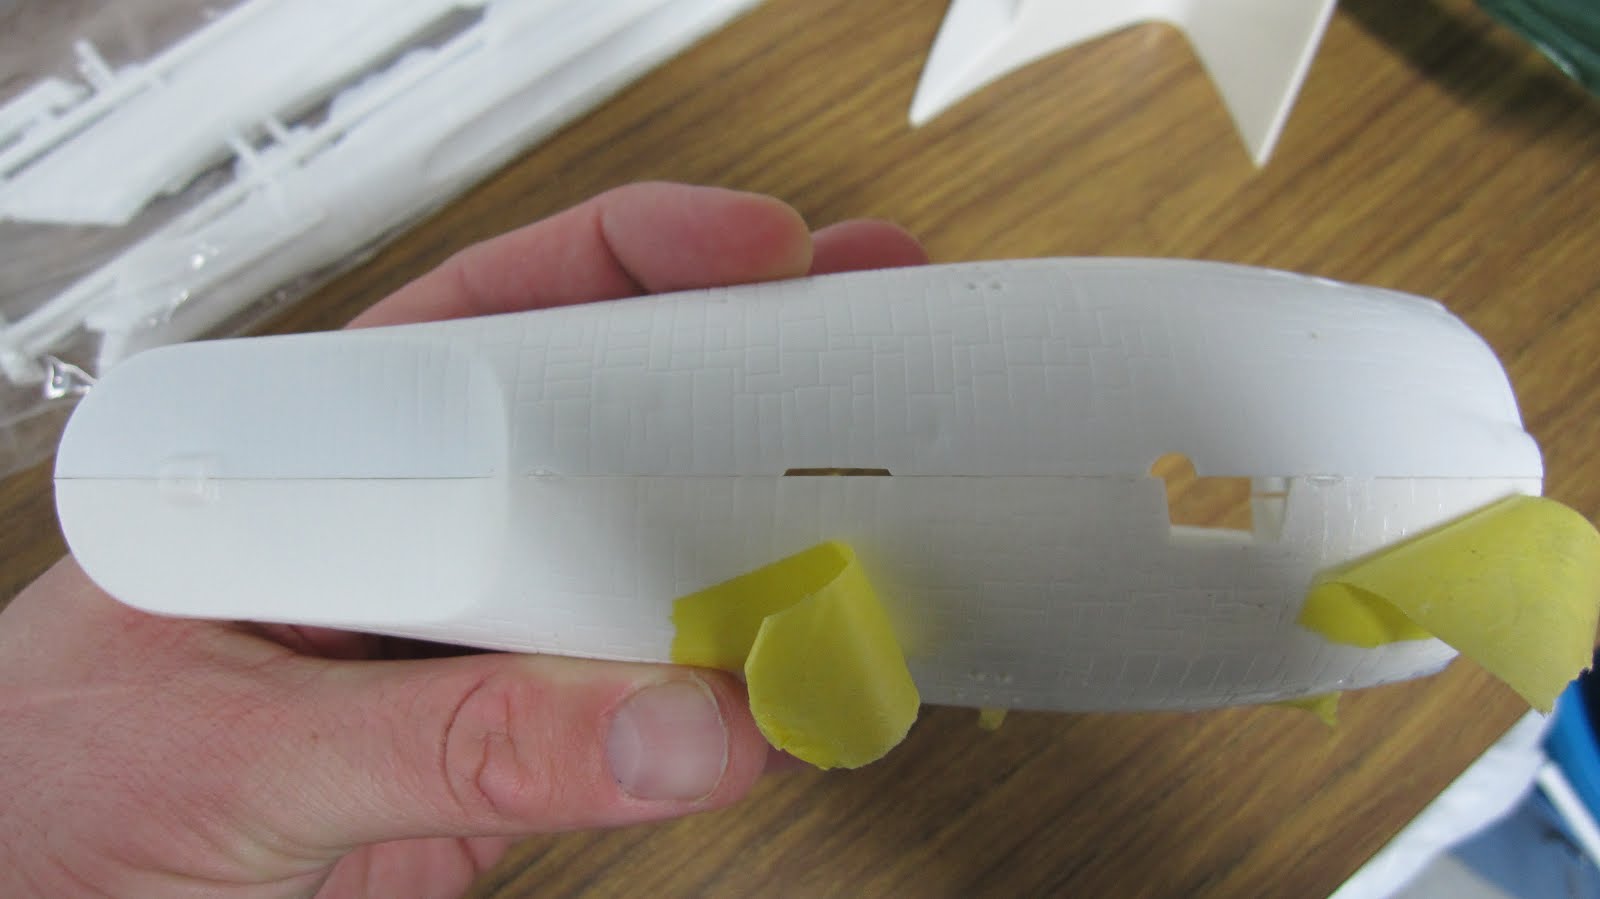


This kit was still factory sealed when I bought it, as were the parts.  The only deterioration was the mold release and the plastic yellowoing.  I have three of these kit currently and this is the most yellow sadly.


Conclusion


Granted, these models are horribly inaccurate to the 8' studio model of the Refit USS Enterprise.  That said, it is 100% bang on accurate to the 2' model used in Star Trek II, Star Trek III and Star Trek VI because, ILM built one of these models, lit it up and used it for the far away shots.  So, Trek model builders, you can say you can build a 1:1 studio build of the 2' model of the USS Enterprise-Refit or -A.  And that's my plan with one of these models, build an accurate, if not crude studio accurate recreation of what was used on screen in long shots.

It does sadden me that Round 2 has decided not to re-release this model kit (along with many other models like the Klingon V'orcha Battlecruiser from Star Trek The Next Generation or the Runabout from Deep Space Nine).  Some of the reasons I've heard were, there's too much wrong with this kit.   I do agree on some levels, but they recently re-released (thank goodness) the USS Excelsior.  The mold was permanently changed when AMT/Ertl made their Enterprise-B kit over 20 years ago, changing the molds forever.  Round 2 built a new set of replacement molds for the new Excelsior.  I'm convinced if there is a will, there is a way.

For those who may come across this model in hobby shops, or online, buy it if you want a piece of history.  If you want a 95% accurate model of the refitted USS Enterprise (-A), buy the big kit, which I'm still working on, or get the smaller 1/1000 kit which is an awesome model!  I've built one of them so far, building a second and looking to get a few more for kitbashing.

Dummies Guide to Fixing the Ertl kit


First fill in all of the panel lines...not at all accurate and the detail is soft, while preserving the gridlines and hatches.  Options include using a high fill primer and sanding.  I did this as a kid with rough sandpaper, and moving up to very fine sandpaper.  It's not impossible, it just requires some work.

The ship is missing a 'landing pad on the lower saucer', re-scribe it.

The windows on the saucer rim are off.  Drill out a new window, and fill in the old one.  Also the aft section windows are not drilled out at all, which include the Rec Deck.

Consider purchasing aftermarket parts like the set Don's Light and Magic offer.  Great work!  (I'm not affiliated with DLM, but I've used his products before and I think they're fantastic).  Also consider upgrading the decals, and geting a masking set to create the Aztek Effect on the hull.

Consider kit-bashing a set of Reliant Nacelles with Enterprise Nacelles.  The reason why, is the grills should be slanted, like they are on the Reliant, but aren't done on this kit.  The front on both nacelles aren't accurate at all.  That said, I have when I was a kid, I filled in the front ends to a similar shape to the 8' studio model.

In consideration, this makes a good sized model.

Happy model building!

Star Trek and all related marks, logos and characters are solely owned by CBS Studios Inc. This fan blog (production) is not endorsed by, sponsored by, nor affiliated with CBS, Paramount Pictures, or any other Star Trek franchise, and is a non-commercial fan-made blog intended for recreational use.  No commercial exhibition or distribution is permitted. No alleged independent rights will be asserted against CBS or Paramount Pictures.


Tuesday, 10 November 2015

Round 2 USS Enterprise NCC-1701-A and USS Brattain NCC-21166 1/1000 scale DOUBLE BUILD UPDATE #6

Greetings!

This will be a short update on The USS Enterprise-A.

I've been really busy with both life and work but from time to time have managed to work on the upper saucer.

I made quite a mess of it with the black primer (sigh).  I wiped off as much as I could. then reapplied grey primer as a light block around the impulse crystal.  Followed by white primer.


One oversight last time was forgetting to mask the impulse engine.


masks for the engine.

Once I covered the engine and re-covered the dome, I reapplied light coats of grey primer to light block the clear parts.


The impulse engine light-blocked in the dark.


The saucer after a coat of white primer.


The impulse crystal is covered with lots of paint, a bit thick, but a light coat of the final colour will really set it off!


An oversight, I still have to add the phaser bumps to the upper saucer.


FINAL PAINTING (on certain parts)

I've added the final accent colour on the pylons as I was spraying that colour on another project.  


So I don't lose the parts, I've assembled the model again.


Here is a comparison with it's larger cousin, a 1/350 scale refit.


That is it for the moment - small update.  My goal is to get the upper saucer completed like the lower saucer, add the electronics and move onto the Brattain saucer/main body.  For Enterprise, my next goal is to move onto the neck, then the nacelles and finally the secondary hull where everything will get tied together.

Happy modelling!!


Friday, 9 October 2015

Round 2 USS Enterprise NCC-1701-A and USS Brattain NCC-21166 1/1000 scale DOUBLE BUILD UPDATE #5 - Up to 'this neck'...

Greetings!

This entry is solely on the USS Enterprise-A.  Although I've done minor work on the Brattain, it consisted of drilling out holes for the phasers on the upper hull and minor sanding.

What a pain in the neck!!


I decided the next step in completing the Enterprise Saucer is to work with and glue the remaining parts, the Bridge/B/C Deck and the Impulse Engine deck to the upper saucer.

BRIDGE/B/C - DECKS


I have continued to paint multiple thin coats of grey primer (from a rattle-can) on the outside of the tear-drop piece, followed by a white primer.


The whole point of this is to light block it from the outside.  I also want to get the detailed painting done while the part is easy to work with.


The bridge itself is gold and the upper dome is silver.  I added multiple coats of Tamiya pearl white to dull it down.


I had to sand down a few rough spots, through the paint unfortunately but this can be touched up later.  The hole its for the SMD for the registry light.

IMPULSE DECK


I previously lit the engines with 2 1.8 mm red LEDs.  Next, I need to light the impulse crystal.

I've debated a bit about this one, in terms of it's colour.  It is generally accepted to be 'blue'.  In the movies however, it appears many different colours.  The only time it is lit in Star Trek The Motion Picture is orange.  Here is a montage of this part in various instances of the Trek Movies:


And since there are many instances in Star Trek II, III, and VI where the 2' AMT model was used, I thought I'd do a comparison shot too.  (For those wondering why not TMP, IV or V and the reason is such:  the AMT model kit came out after TMP; IV there were only 4 shots of the Enterprise-A and they were all the 8' studio model and in Trek V, a different visual FX company did the FX job and it looked like to me they only used the 8' model).

from Star Trek III: The Search For Spock - there are a lot of subtle differences

And finally here is the part today on the 8' studio model.  My understanding the models used a neon lighting system.  I'm assuming the model makers would use cinema gels like were used on set to give back-lit panels different colours.  The dome itself I'm guessing is removable considering the gap on the forward (camera left) edge of it.  I can only assume the part is made of a translucent resin which has yellowed over time, giving it a greenish look in Star Trek VI.


from the Christie's Auction
On the Miranda Class Reliant, it's clearly blue.


So I will be using a blue 3mm LED to light this part.  On the Brattain, I'm going to use a 5mm blue/orange dual LED so I can create that effect as seen in Star Trek The Motion Picture.  When I do my 1/350 Refit, I think I will use an RGB LED with 4 leads so I can control the colour, same goes with the engines.

Back to this build....


The neck, in it's current state is in three pieces, the two hull halves and the torpedo launcher (replacement part).  Since it is uber detailed, I first painted the launch tubes with Micro Mask which is a liquid masking solution.  After I prime this black, then grey, I might just hand paint it.  Lots of deep crevices.


The next step for me is to locate the centre of the impulse crystal on the neck which will light up from the neck below.


In order to properly figure out the centre on the impulse crystal, I had to light block from below, using Tulip which is a black fabric paint.


Here it is in place.


So onto the neck.  I started to add all the fiber optic elements to the portholes.


I held them in place by hot glue. along with the LED.


Then I tried to close it and mount it to the saucer.  Damn thing wouldn't close.  Too much stuff and when I tried to feed it through the opening in the upper secondary hull, I realized that would work either.  Time for a larger hole.


But then the big problem hit me, I couldn't attach the torpedo bay.  So I ripped out all the fiber optics (saved them for future use) and the LED I'm using, I should move the resistor further down so there is  less bulk in the neck.  This is when I remembered about the fit problem with the old neck...

(original neck, early build)
(gap in old neck)
(gap with new torpedo bay)
OMG!!  It's worse!  This made me question why I bought this part.  But the rational, and logical side prevailed.  A model builder's mantra:

It's only plastic, it's only plastic...or in this case resin and plastic.  And brass etch...I digress, the solution!


Since there is such a wide gap, one I can't fix with just putty alone, I started to glue pieces of styrene (not sure of the thickness) under the torpbay (torpedo bay for short, often seen onscreen in the TOS films - yes I'm a geek).


Once I got the first layer of 5 minute epoxy on the parts, I left them to dry.

Back to the neck, I've had a change of heart of how to build this model, something I've rarely ever done before, pre-paint my parts, or at least sections.  The Enterprise Refit, and Ent-A are a patchwork of multiple parts, not a smooth surface unlike the TOS Enterprise.  So why not build it that way?? Snipped off fiber optics work well on Star Wars ships like the Star Destroyer, or even the Klingon Cruiser from TNG (future build), not smooth ships like the Refit Enterprise.  So for all the windows, I  will finish those areas of the ship.

On the neck, I cleaned up the part, re-primed it and then painted it Tamiya Pearl White.


The leading edge and spine of the neck are painted blue so the puttying in those areas won't matter.  The checkmark shape on the neck is a repeat of the 'skeg', as it is called, on the nacelles by designer Andrew Probert.  


The skeg was added to the nacelles by Richard Taylor apparently and Mr. Probert added the design to the neck to keep it consistent.  There was also at one point a planed saucer separation in this film, the skeg would act in the same fashion as the nacelle version.  It should be noted, Mr. Probert's Vulcan Shuttlecraft also has a skeg on it too.


I digress.   I never bothered to clean up that area.  The area below the windows will indefinitely get marked up again, so i left it as is.


PRIMARY HULL/SAUCER SECTION


So the time has come to add the impulse engine to the saucer.  I used 5 minute epoxy to glue it.

I taped off the section to minimize Epoxy spillage.

I left the model after gluing it up for 30 minutes, then hung it up on my peg board with the lower saucer.  I then took a break from model building, (freelance work means you have long and short breaks between gigs) and notice the part didn't hold.

(insert four letter word)

This build is literally a 'multimedia' project meaning I'm using styrene plastic (opaque and clear), resin parts, brass parts, fiber optic strands (very fragile) and LED + electronics.  There is no one glue for everything.

First thing which occurred to me, my epoxy maybe too old.  I think I bought it for an aborted USS Voyager build in the late 90s.  New epoxy is in order:


I re-glued the impulse deck with great success.


Now to assemble the Bridge/B-C deck to the Upper Saucer.


Unfortunately there is quite the gap around the superstructure.  Part of that is trimming the saucer trying to align the part correctly.


I lost a window in the process.  I will have to scratch it out.

I think this part would have been a better fit if it attached from above, rather than underneath.


I filled the gap with Evercoat Metal Glaze filler.  It makes for a strong bond.

Now for the lower saucer...

Since I have the time and resources, I figure I can soon close this saucer.  That would be a major step in completing this model.

So I started off by painting the lower planetary sensor array on the bottom of the saucer.

I painted it light blue and silver with a layer of Tamiya white pearl on it.


(reference shot of the Ent-A currently)
The darker panels on the Ent-A version are not symmetrical compared to the original paint scheme in 1979.  A lot of this has had to do with both the repair of the battle damage as seen in Star Trek II and III, but the whole ship was dusted down with dulling spray, loosing it's glimmer.

Here is my model, painted up, with just white primer as the main hull colour.


Now the pearl white.


I didn't paint the lower sensor array as it is supposed to be light gray and I believe the decals will adjust for this.


The 4 solid rectangles are supposed to be landing legs for the saucer.  They should be darker, something I will have to fix.


Next to all the landing legs are other access panels where the hull grid lines go through.  I believe this little blue spot is a 'touch-up' on the 8' model.


The grey panel in the centre is the plug for the airlock Spock leaves through to contact V'Ger in Star Trek The Motion Picture.


original studio model
Star Trek The Motion Picture
I believe the part got lost or repainted as this part of the ship receives damage in Star Trek VI.

So this is where I'm currently at, a completed (although more details to paint) on the lower saucer and an upper saucer nearing completion once I blend in the add-on parts.  This means this could be the first completed subassembly for the USS Enterprise-A.


I hope you enjoyed it, happy model building!!!