It's been a while, busy with life, work, work, new projects and such beautiful weather. I digress so here's the latest and greatest...
I decided after experimenting with one warp nacelle to move forward and drill out all the windows on both models. By accident and frustration, I discovered how exactly to use Kristal Klear which solved all of my issues of how to fill these windows in, it is the easiest method but also the most effective. On this scale, resin would make nice windows but would have to be masked. All of these windows have rounded edges which at 1/1000 would be challenging to reproduce.
Photoetch - I'm embracing photo etch parts! Great detail but I've made a few mistakes along the way, including distorting my window masks due to overuse. More on that soon.
Ok, now for the update!
DEFLECTOR DISH
While fiddling around, I studied the differences between the 1/1000 and 1/350 deflector dish, especially how to light them. The 1/1000 has an extra ridge which I cut down and started to sand to shape. This was previously visible from the front.

Eventually the radial lines will have to be painted white via masking (not looking forward to this task at this scale but the result will look amazing!)
 |
| I chipped a piece of the dish from the backside as you can see at the '9 o'clock' position on the dish. This I have fixed by further sanding and polishing. |
Still fits in its housing.

Final result.

SECONDARY HULL WINDOWS
I took the Enterprise apart to drill out all the windows and flood lights.


 |
| Here it is back together, both for test fitting and to keep the parts together; I must say it's refreshing to see a 'Connie' Refit with accurate lines and details compared to the old AMT/ERTL version. |
I still want to do the RCS thrusters which appear on the nav deflector housing but I will need to print off duplicate decals to locate where to drill them out. These are the only RCS lights on the Ent-A that are prominently visible. The saucer ones are dark and the Warp engine ones are too tiny to drill out at this scale.
SAUCER PHASERS (both ships)
One of my biggest pet peeves with most of the 'Refit Era' or the TOS Movie Era model versions of the Enterprise, Reliant, Excelsior and Enterprise-B (which the upper saucer is a different mould), is that model producers put a raised panel underneath the phaser bumps.

(1/350 Polar Lights Enterprise)


(1/537 ERTL/AMT Reliant)
This is what it should look like:
 |
| Star Trek: The Motion Picture |
 |
| Star Trek II: The Wrath of Khan |
So my attempt to to recreate this is as follows:
Scribe the lines around the phaser bank with a razor knife. Scrape off the details. Drill out holes, the same size as the windows for the each phaser. Cut a small piece of fiber optic, bloom the head with a lighter and glue it in the opening.

On the Brattain, the banks are in the wrong spot so that means creating a new set and sanding away the old set.

LOWER SAUCER WINDOWS (BOTH SHIPS)
On the Enterprise, this was easy. There were recessed holes to drill out. On Brattain, I used the Paragrafix guide.

I hate to say this, but I found the set to be off in comparison to the studio model. They are workable though. When in doubt, refer to a screen cap or Christie's Auction photos.


The Enterprise and the Brattain have the same type of windows along the rim of the saucer, except the Brattain's windows are spread further apart.


I later sprayed the saucer parts with both grey and white primer outside and black and white primer inside. This filled the holes unfortunately.


SAUCER RIM WINDOWS
The Enterprise and the Brattain have the same type of windows along the rim of the saucer, except the Brattain's windows are spread further apart.

(upper drilling plate - Brattain, lower drilling plate - Enterprise)
When I first bought the Paragrafix set, I started off with the rear windows, just port of centre.


I later sprayed the saucer parts with both grey and white primer outside and black and white primer inside. This filled the holes unfortunately.
On the opposite side there is the 'recreation deck', first and only shown (the set interior that is) in Star Trek The Motion Picture, which makes the saucer not symmetrical.
The reason for putting the Rec Deck there on the saucer was the decision made by the Production Designer, Harold Michelson, who famously said, 'no one goes to a movie with a slide rule', as there was opposition in the art department to putting the set there because it physically is too big to fit in the ship. (source - multiple references from the internet such as http://ottens.co.uk/forgottentrek/ and memory-alpha.org)
Back to my build, here is the template lined up, ready to go.


I tried to drill out and square up the holes but it was nearly impossible and I made a mess of it.

Then the 'light bulb' went off and I came up with the idea of using the template as an insert for the windows.

A bit of sanding, Evercoat Metal Glaze...


 |
| Star Trek The Motion Picture |
 |
| Star Trek II: The Wrath of Khan |
 |
| (Harold Michelson - source, Google search) |


I tried to drill out and square up the holes but it was nearly impossible and I made a mess of it.

Then the 'light bulb' went off and I came up with the idea of using the template as an insert for the windows.

A bit of sanding, Evercoat Metal Glaze...

sanding, priming, and repeat...

For the remaining windows on Enterprise, I went around and drilled them up, but I found a few things:


What I've since learned to get perfect windows, I start in the centre, then tape the centre and get the sides done 2nd.

I use a very fine file, and a brand new X-Acto blade #11 to clean up the rectangular windows.

I didn't drill out the bottom two windows for one reason - the template is wrong, the lower windows should be centred between the two window ports above, not off centred.
To repair the old windows, I used Bondo Glass on the inside and Evercoat on the outside.

Reprimed, ready to go!

Last set of windows to complete (and the lower individual ones too)

- the template can move on you if you don't tape it down,
- you can drill through the template which changes the shape of the windows
- don't drink and drill - i misaligned it by one grid line - FAIL

PERFECT!

FAIL!
So I learned many lessons doing these windows. Evercoat is a good filler but I found it to be soft for drilling out new windows, so great care was taken during this process.
FINAL RESULTS:


BRATTAIN RIM WINDOWS:
The Brattain (Reliant) has the same style of windows, although spaced further apart. So I started on the port side and drilled out the first few windows of the L-shaped template.

Upon mounting the 2nd template and drilling out the windows, which you use 4x on the forward half of the saucer, i noticed these windows don't line up with the L-shaped template. Frustrated, I moved onto the Starboard side to see if I could do a better job.
I first noticed the alignment was off going off the edge of the saucer for the larger window segment, so aligned it to grid.

Second thing I've noticed, in order for the standard windows which wrap around the hull (x4), you need to lower them by about 1 mm.

What I've since learned to get perfect windows, I start in the centre, then tape the centre and get the sides done 2nd.

I use a very fine file, and a brand new X-Acto blade #11 to clean up the rectangular windows.
 |
| The black drops are for light blocking the new and improved phaser banks. |
The reveal: perfect windows!!

I didn't drill out the bottom two windows for one reason - the template is wrong, the lower windows should be centred between the two window ports above, not off centred.
 |
| The template |
 |
| Clearly centred - TWOK - USS Reliant |
 |
| Paragrafix uses this exact screen shot for their product. You can see the lower windows are entered between the upper windows.
Not a knock on the quality of Paragrafix products, they are amazing. This detail unfortunately is wrong. I'm glad such a company exists so model builders can add that specific detail to the model. That said, when I notice an inconsistency, I will point it out.
|
 |
| When I go to add the lower windows, I will lay down a duplicate copy of the decals as a guide. |
To repair the old windows, I used Bondo Glass on the inside and Evercoat on the outside.

Reprimed, ready to go!

Last set of windows to complete (and the lower individual ones too)

In order to finish the rest of the windows on the Brattain, I need to attach the Rear Bulkhead, which has the dual shuttle bays and impulse engine in the middle.


At this point, I have removed the details on either side of the shuttle bays so I can add the PE part, and I've removed the material for the impulse engines.
For the launch bays, I have 3 options:
1) Do nothing:
something I already started to do, but add holes for fiber optics.
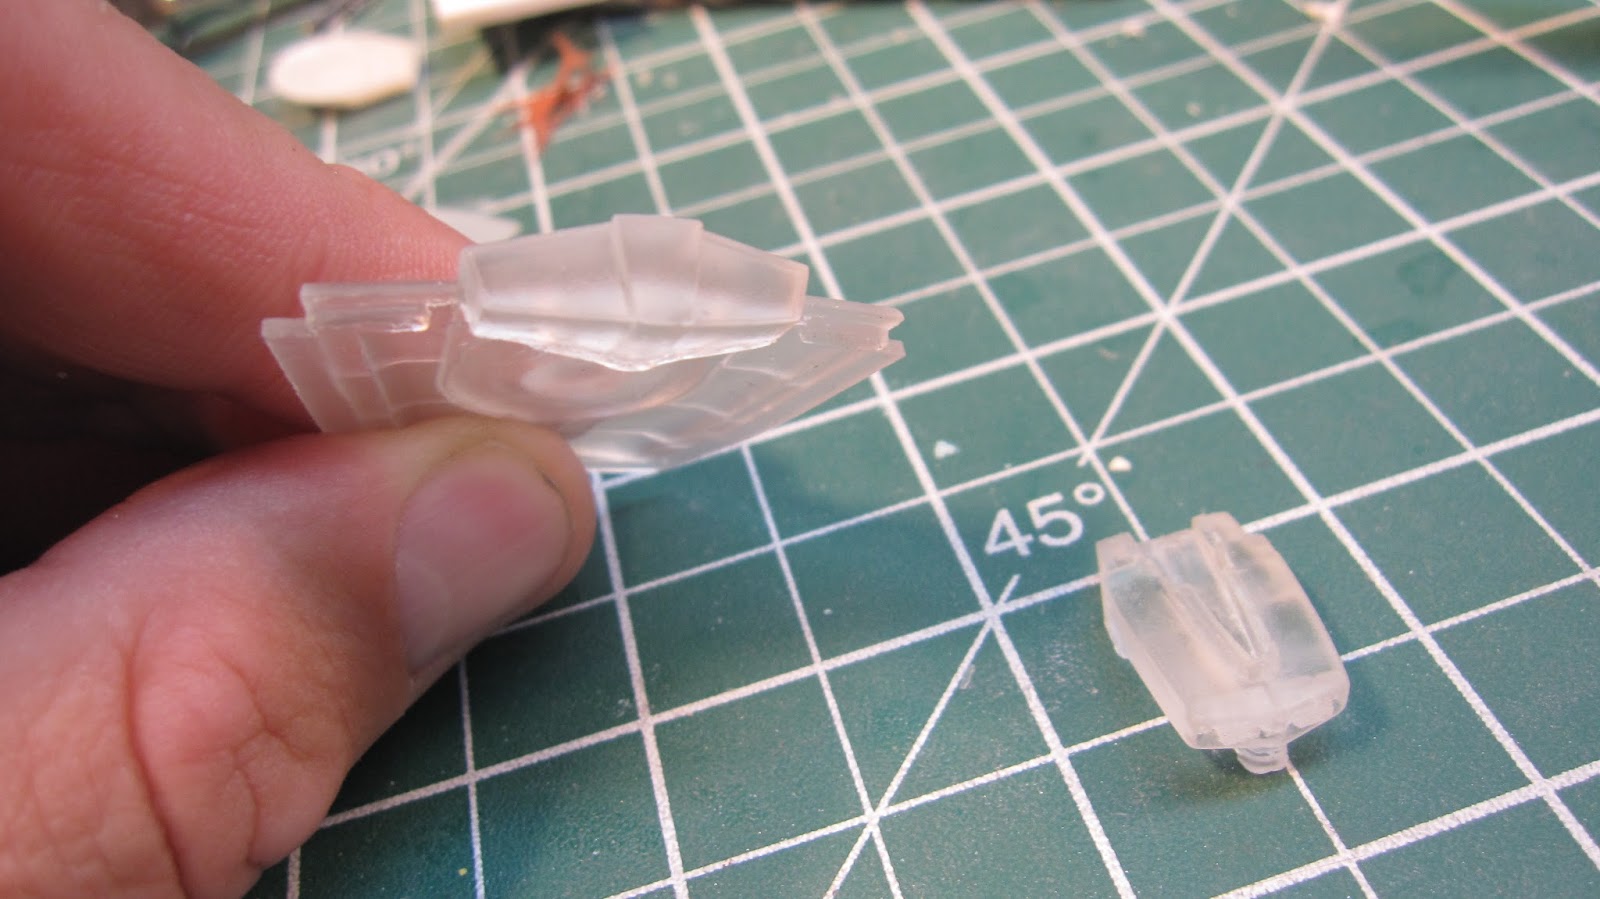
2) Clear cast a new shuttle bay:

3) Use the Paragrafix set to create the long dashes of light:

The Paragrafix set is accurate to the shuttle bay with the light opening in the right places.

Since the aftermarket decals by Round 2 include detailed shuttle bay doors, I thought it important to double check to see if the Paragrafix set would match...they clearly don't.

These window templates are pie-shaped and sort of follow the radial grid lines from the centre of the saucer. When I started to figure out the alignment, I realized there is a problem with accuracy either with the model or the drilling set as the windows doesn't seem to match the studio model. I decided to just go with it as this isn't the Reliant, but a sister ship built in the early 24th Century - maybe variations on windows...(also the easy way)


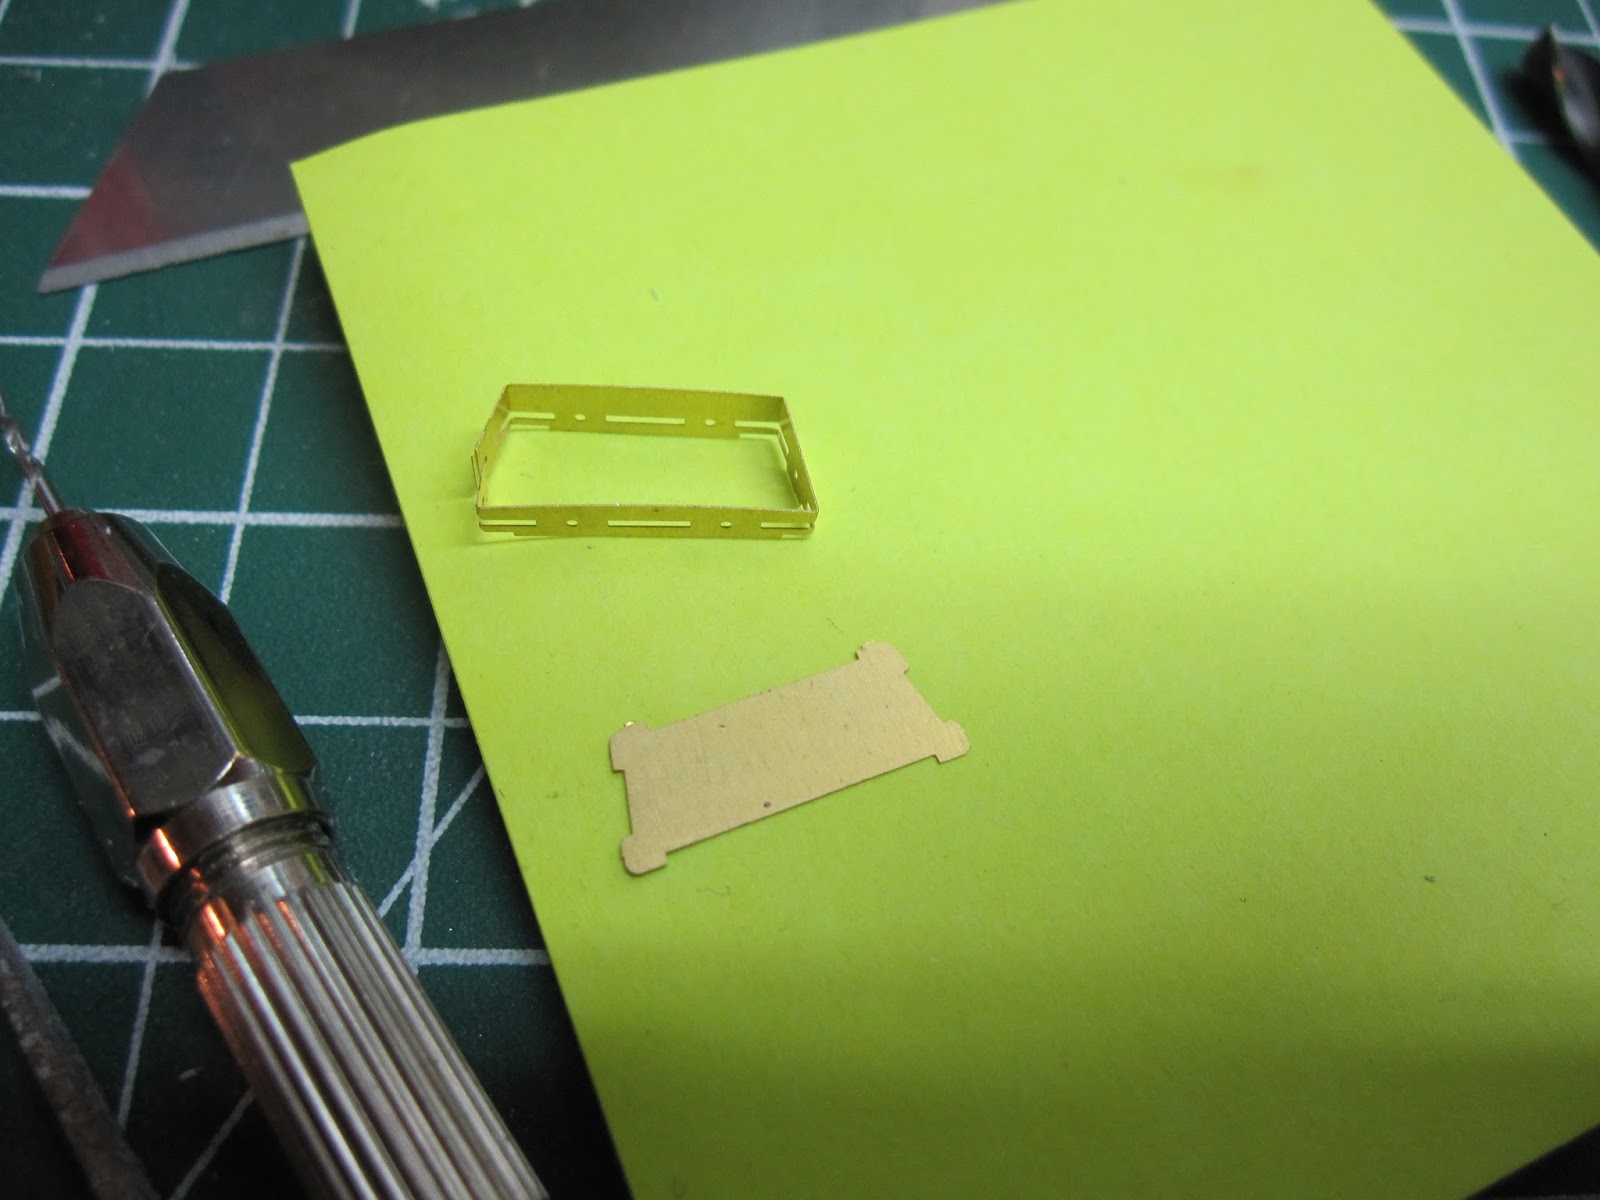
Not too many windows and I was really looking forward to using the photo etch set to make the 4 windows on the officer's lounge at the rear of it.


I tried my best to stick it down, and I dared not use CA as it would melt the clear piece underneath the window frame.
I finally got it down and I hate it. This is not a criticism of the manufacturer, but my inexperience. The detail work of Paragrafix work is impeccable.

The clear part is smaller than the window frame and I bent one of the frames while trying to blend in the PE. The window size should be correct with the PE part. I think Round2 got this detail wrong.


After all of this, I decided to order aftermarket parts instead, from Tetryon to replace the Bridge, Torpedo Launcher and Impulse Deck. (Tetryon is a Canadian company - as a Canadian, it's nice to see Canadians in the Star Trek aftermarket community.)

I must say I'm really impressed with the overall quality and accuracy of each part.


The Photon Torpedo Launch Deck.

There are spots in the pieces for 3mm LEDs, that's a great feature!


USS BRATTAIN B-DECK
As I've been ordering materials for the 1/1000 build, I've also been ordering materials for the 1/537 scale USS Reliant I have (original AMT release). I've have two AMT kits, one still factory sealed and one I use as reference with this build for inconsistencies with the Studio Model built by ILM.
I was about to use the drilling template for the B-deck but the band where the windows are supposed to be was too thin. So I improvised. I couldn't use the window frame for the Officer's Lounge at the rear of the B-deck so I decide I will use fiber optics instead. A good compromise.

Then I looked at my aftermarket Round 2 decal sheet which has this band as part of the decals and it too was thick, relative to the model, so I started to look at reference sources. The model is wrong, the decal, the drilling template are right, so I took a drink and began surgery on the upper portion of the B-Deck...

I carved out a new line with an X-Acto blade and then suddenly the B-deck looked the part. The tricky part is getting it even.
Once I made my initial slice into the B-deck, I used a triangular shaped file remove the excess material and 200 grit sandpaper to fix the rest.
It's not perfect, but a work in progress.
Lots of work on both models, both still in an 'ugly phase'. Nothing actually assembled yet but this is all part of the prep. I've decided to change my strategy to do both saucer sections first, then the nacelles, rollbar/neck and lastly the engineering hull for Enterprise.
That's about it for now. It's been a busy summer and I have a new blog entry to write about, coming soon.
Happy model building!!


At this point, I have removed the details on either side of the shuttle bays so I can add the PE part, and I've removed the material for the impulse engines.
For the launch bays, I have 3 options:
1) Do nothing:
something I already started to do, but add holes for fiber optics.
2) Clear cast a new shuttle bay:
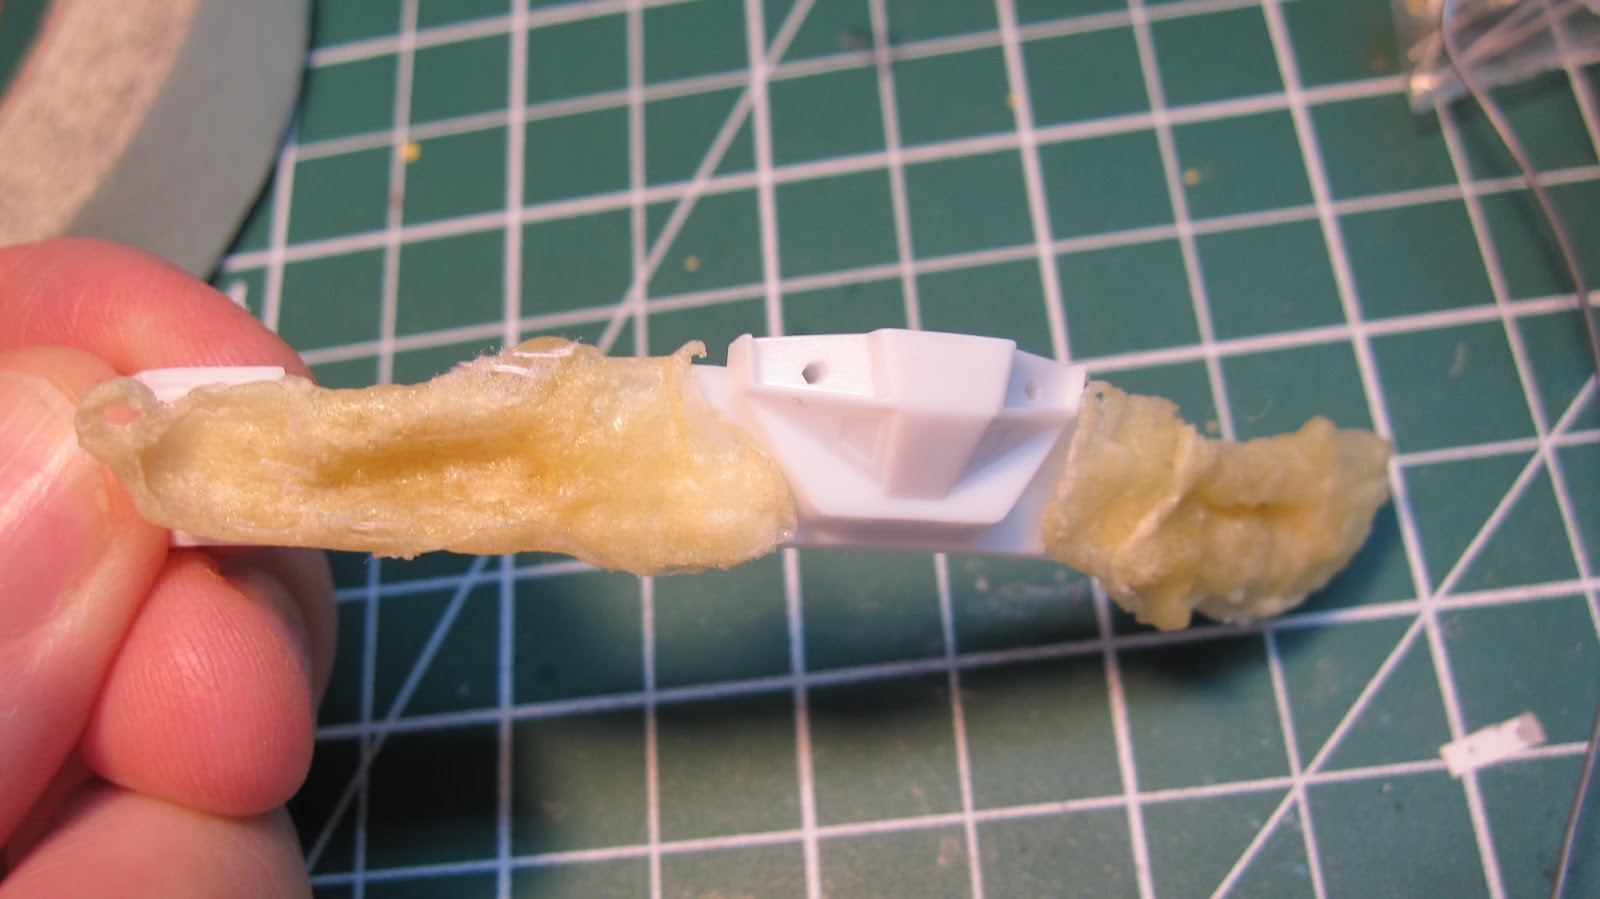
 |
| the latex plugs for the shuttle bays |

The Paragrafix set is accurate to the shuttle bay with the light opening in the right places.
Since the aftermarket decals by Round 2 include detailed shuttle bay doors, I thought it important to double check to see if the Paragrafix set would match...they clearly don't.
 |
| Unfortunately, the decals for the shuttle bay doors don't match the Paragrafix set - I will need to create my own. |

UPPER SAUCER RIM
These window templates are pie-shaped and sort of follow the radial grid lines from the centre of the saucer. When I started to figure out the alignment, I realized there is a problem with accuracy either with the model or the drilling set as the windows doesn't seem to match the studio model. I decided to just go with it as this isn't the Reliant, but a sister ship built in the early 24th Century - maybe variations on windows...(also the easy way)


B/C DECK - ENTERPRISE
Not too many windows and I was really looking forward to using the photo etch set to make the 4 windows on the officer's lounge at the rear of it.


I tried my best to stick it down, and I dared not use CA as it would melt the clear piece underneath the window frame.
 |
| The yellow tape outlines where I filled the outline of the RCS. |

The clear part is smaller than the window frame and I bent one of the frames while trying to blend in the PE. The window size should be correct with the PE part. I think Round2 got this detail wrong.
 |


After all of this, I decided to order aftermarket parts instead, from Tetryon to replace the Bridge, Torpedo Launcher and Impulse Deck. (Tetryon is a Canadian company - as a Canadian, it's nice to see Canadians in the Star Trek aftermarket community.)

I must say I'm really impressed with the overall quality and accuracy of each part.
 |
| The original bridge was just wrong - too much to fix. |

 |
| finally a refit impulse deck that is accurate!! ERTL, Bandai, Polar Lights and Round 2 got this part wrong every time!!! |
The Photon Torpedo Launch Deck.


As I've been ordering materials for the 1/1000 build, I've also been ordering materials for the 1/537 scale USS Reliant I have (original AMT release). I've have two AMT kits, one still factory sealed and one I use as reference with this build for inconsistencies with the Studio Model built by ILM.
 |
| AMT 1/537 USS RELIANT |
 |
| ROUND 2 1/1000 USS RELIANT (BRATTAIN) |
The area below the bridge, generally called the "B/C Deck" on most Constitution class vessels is a superstructure which represents 2 decks, on this starship it is only 1 deck thick vs. 2 decks (a lot of the lower deck is buried in the saucer according to official plans). This detail is not too important, except for window placement.
The Bridge/B deck on this ship seems off to me when I look at the studio model. Of all of the officially released Constitution Class variants released, I would say only Polar Lights 1/1000 scale TOS Enterprise and Round 2's 1/350 scale accurately represents this section of the ship. I don't understand why consistently there is a need for aftermarket parts to replicate it properly?!? I digress.
I've been using my 1/537 scale Bridge/B deck clear cast resin part from Don's Light & Magic as reference to 'fix' the B-Deck on the Brattain. (An awesome, accurate part I must say!)
 |
| DLM Parts for USS Reliant |
 |
| DLM Part sitting on the Round 2 model |

Then I looked at my aftermarket Round 2 decal sheet which has this band as part of the decals and it too was thick, relative to the model, so I started to look at reference sources. The model is wrong, the decal, the drilling template are right, so I took a drink and began surgery on the upper portion of the B-Deck...

I carved out a new line with an X-Acto blade and then suddenly the B-deck looked the part. The tricky part is getting it even.
 |
| Screen cap of the USS Brattain as seen in Star Trek The Next Generation. |
 |
| More refinements to B-deck ridge. |
 |
| And the bridge in place, or my casting of the bride in clear resin. |
Lots of work on both models, both still in an 'ugly phase'. Nothing actually assembled yet but this is all part of the prep. I've decided to change my strategy to do both saucer sections first, then the nacelles, rollbar/neck and lastly the engineering hull for Enterprise.
That's about it for now. It's been a busy summer and I have a new blog entry to write about, coming soon.
Happy model building!!
Hi do you know where i can get the Tetryon parts for the 1/1000 refit enterprise from? i have checked various sites but they all point to Tetryon who is closed indefinitely!
ReplyDeletePaul