This update is going to focus solely on the subassembly of the Upper Primary Hull for the model of the USS Excalibur.
This is a big model kit! Just as a reminder, this is a comparison of Primary Hulls (Saucer Section) of 5 different historically commercial available kits:

Round 2 is the only manufacturer producing Star Trek model kits in North America. The ERTL and Bandai kits are 'out of print', but can be found either online or in some hobby shops. I managed to pick up a Star Trek VI: The Undiscovered ERTL kit for $20 3 years ago and recently a Star Trek III kit, still factory sealed, for $70, which is on par considering the model used to sell for $25 30 years ago. I digress.
PAINTING
This build, like with my1/1000 building of the Enterprise A (on hold for now), I've decided to work outwards from the centre of both the upper and lower saucer.
The base colour of any of the TMP Era (The Motion Picture, AKA the original series Star Trek films, 1 through 6) Federation ships is white. Specifically the Refit Enterprise is a Pearl White (with tones of pearl red, green, gold and blue). For this build, I'm sticking to the pearl white and using the supplied decals.

An advantage of starting at the centre of the model is I can later mask just this area to protect it.

Here is the Bridge and B/C deck painted up. I have added an 'Aztecing' by alternating pearl white vs. flat white. I also added more windows at the front of the model.

I added those windows as an homage to this image I remember as a kid, from the cover page of the 'read-along' Star Trek The Motion Picture Storybook. A lot of early promotional material for STTMP had early 'test' shots of the Enterprise before the shooting model was 'refitted' further with self-illumination and a direct replacement of the Bridge module and lower dome of the saucer section (not to mention paint changes and decal re-positioning). Since this is Excalibur-A, I figure I want to make this ship different from Enterprise-Refit. One way is adding more windows.


One will note, I've added the registry. I've done that for 2 basic reasons: a) as a gift for presentation; b) to see how the custom decals look on the model.


The final look of the model will have an aztec pattern all over the ship, using the kit supplied decals.
ASSEMBLY
The first part I added to the model is the Impulse Engine part I modified (in the previous entry). The upper edge of the Impulse Engine 'nozzle' had to be thinned down, this was accomplished with a Dremel tool and a cutting wheel.

I used 15 minute epoxy to attach the clear part to the hull (same thing with adding the extra bits of styrene) and left it clamped together for 24 hours.

The fit is rather poor. There is a gap on both sides of the engine where it meets the edge of the saucer. This has more to do with the way the model was manufactured vs. my modifications.

Where there is a gap, it can always be filled. In this case, I used Evercoat Metal Glaze. This stuff works the best for shaping an sanding.

The next two photos compare the original part (I have two of these model kits).


The next step was to attach the remaining saucer walls, starting aft from just port of the Impulse Engine coming around fully to the other side. I used a combination of tape and mini clamps to hold the material down.


Once I got to the other side of the Impulse Engine, I had a large gap to fill on both sides under where it meets the saucer wall. I used pieces of sheet styrene to plug the hole and Evercoat to fill the gaps.

IMPULSE DEFLECTOR CRYSTAL
So this was a part I though I could easily mask off, quick and easy with Elmer's White Glue, oh boy was I wrong.

I have heard of other model builders use this in the past, so I thought it was worth a shot.


 |
| The surrounding area and the 'cage or spokes' are the same colour which is one of 2 main accent colours on the refit, both shades of blue. |
Unfortunately, when I started to remove the white glue, it made a big bloody mess of the part.
I knew I had to start over with this piece. It is fortunate I have two of these kits (largely unbuilt), an original 2005 release and a version I picked up in March of 2015. I had to cut off the 'crystal' and to be on the safe side, I casted a mold of it in case lightning strikes twice and mess up the paint twice.
 |
| My intention for the second model is to scratch build a 'heavy destroyer' class, I may reuse this part or create a custom Impulse Deflection Crystal. |
This time around, I masked off each opening individually, cutting each pane out. It did turn out to be a bit of a pain.

The results are not perfect but I can live with this. The dome on the right side is a good kit bashing part for future use. (It kinda reminds me a bit of a 1970's hub cap).
 |
| Left - replacement part; Right original 1st attempt |
I then further diffused the part by spraying it 'matte coat' on both sides and used steel wool to rough up the underside.
VIP LOUNGE
One of the script elements in Star Trek The Motion Picture was a set called the 'Officer's or 'VIP Lounge' which is situated at the back of the B/C Deck. Although this appears in the film as a maquette when Spock's shuttle is preparing to dock,
 |
| Star Trek The Motion Picture |
 |
| Star Trek The Motion Picture |
...there has been great debate as to where Kirk, Spock and McCoy are in the ship when we see the stars streaking by in reverse behind a great big window.
 |
| (Theatrical Version) |
My assumption has been they are in the Rec Deck and the Director's Edition of Star Trek The Motion Picture seems to support this.
 |
| (Director's Cut) |

So here is the model part.

As always, I prime it, both sides for paint adhesion and for light blocking.

Here it is painted up. I used an 'antique white' rattle can for the base coat. The chairs, trees and flooring were hand painted. Also the supports on the back wall are painted silver.

Since there is a large blank wall (above) I thought it would be important to break it up with another image. An option for me is to use the Paragrafix decals which come with the add on PE set I bought for my 1/350 Original Series USS Enterprise.

Here it is complete. I went with decal 'C' which is a star chart.

Here is the VIP Lounge, installed look through the kit provided glazing. The clear plastic is WAY too thick. That said, it does look like there is something there rather than 4 white windows.

The lighting here is from a 60W light bulb with the upper saucer placed in front of it.
WORKING WITH A 16" SAUCER - PAINTED
For this build I realized early on, I will need a jig to hold the massive saucer level when I work on it. The upper saucer in my build has the majority of the lighting in it, so it will need to lie flat on the work bench. I had ideas of building an elaborate fancy rig but sometimes simplicity is best:

This is simply 2 4x4 of dimensional lumber I had as scrap, with the top wrapped four times over with an IKEA throw blanket which costs only $2.99 CAD. What's really nice about this, I can use this for many different projects. Similarly, I have a 'temp base' made of 2x8 dimensional lumber I have reused often, ever since I built SFS Tesla.
LIGHTING
Early on, I decided this build would be able to have lighting options to have it in different modes. Some electronics suppliers who build custom kits offer 2 modes to showcase this model. I personally like the ability to turn on and off specific parts of the ship. This is the first model I've started to do this on. (Actually I was doing this on the dual build of Enterprise A & Brattain but I only just started to light them when I began this build).
For me I use colour coded wires for each function. My wire supplier has about 12 different wire colours. Black is always the return current (DC) in a build. For this build, I'm using RED as main power, YELLOW as external lighting, GREEN as 'station keeping' (thrusters, nav lights and strobes), etc.
The Refit Enterprise (in this case Excalibur) has a dual blinking set of lights. The rapid strobes, or often called 'anti-collision' lights are easily achieved by using a 'flashing LED' (which tends to flash rapidly). For the the slower flashing Nav lights, I'm using a kit I bought at one of my electronic suppliers for $3.99 CAD! (Considering the exchange rate between the US & Canada - where I live, this is really cheap!).

This product, made by Velleman's, is a dual 9V LED flasher. I tweaked one, a prototype, to replace the one LED with a resistor, and the other LED connected to 10 LEDs on a bead board, running on 12V and it worked perfectly!! It's a fraction of the price of buying expensive boards for $80 USD, if you know what you are doing. I'm not a electronics guru, but I understand many of the basics. This board works on a 'push/pull' system of on/off and you can set the times of on and off by utilizing the two potentiometers on the board. I digress, onto the fun stuff, lighting!!
The 8' studio miniature of the USS Enterprise was lit internally with neon lights which was a 'pure' white. The details were lit with 'grain of wheat' light bulbs which were orange-like compared to the white of the neon tubes. For my build, I'm using warm white and bright white LEDs to recreate that look.
Like the painting, I started off by installing LEDs in the bridge section first. I have a cool white LED for the strobe, a warm white SMD for the registry light and a pair of warm white LEDs for the semicircle viewing ports on either side of the docking port at the rear of the bridge, deck A.
 |
| Star Trek The Motion Picture screen cap |

For the lighting ports, I have 'borrowed' a 2" warm white LED strip from my 1/350 USS Enterprise TOS lighting kit. I blacked out every other LED on the strip with Black Tulip fabric paint.

Here are the results:


To isolate the lighting from the rest of the ship, I used black card stock, hot glued under the bridge so I could add my next strip of lighting, the B/C deck.


Now onto the Impulse Engine...
It is generally accepted by most that Impulse Engines produce an amber-red light. All of the Federation ships in the TNG era are this colour, if not red. Here are a few examples of the Refit Enterprise with such a colour.
 |
| Star Trek III: The Search For Spock |
 |
| Star Trek II: The Wrath of Khan |
To achieve the same look, I hot glued a cinematic filter, LEE Filters #216 Diffusion behind the Impulse Engine.

I then hot glued the amber LEDs in place and aimed them appropriately.

When this model is completed, I will be making a custom decal with louvers to cover the Impulse Engine, much like the studio model.

That said, there has been one occurrence where the Impulse Engine appeared light blue:
 |
| Star Trek V: The Final Frontier |
In fact a lot of earlier promotional stills also showcase the Enterprise with a blue engine, so I've made that an option for displaying.
 |
| Star Trek The Motion Picture- promotional still |
 |
| Box art reference photo on early AMT/Ertl model packaging |
 |
| Paint and lighting test - original configuration of Refit Enterprise |
I used a strip of blue LED tape lights from behind the water-clear amber LEDs to achieve an even coverage of the blue light.


To light the sidewalls and light the window ports on the lower saucer, I made up pre-wired and soldered LED strips.

Once all of the LEDs were in, and tested, now was the time to hook everything up, and neaten the wires with hot glue.


Once I glued down all of the wires, I realized the last two things to do is to stop light contamination from one circuit to the other.
Below is a reflector to reflect the light back into the Impulse Engine area.

I also added a ring to the Impulse Deflector Crystal to light block it from the rest of the surrounding window ports.
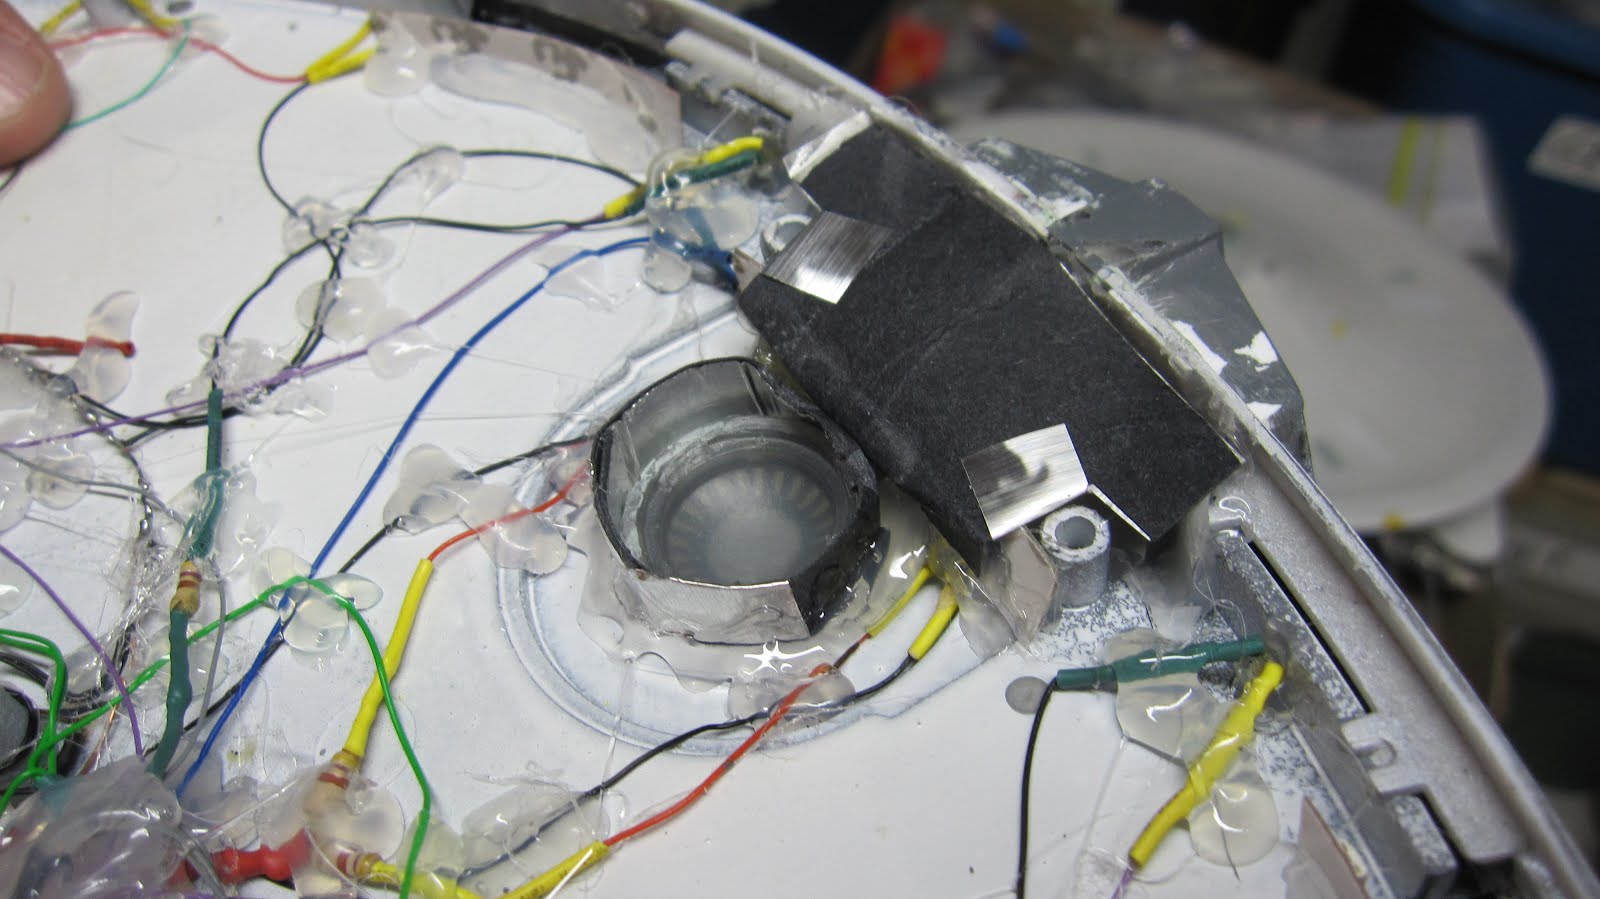
And here it is, all the wiring neatly hot glued into position. It may look like 'spaghetti' from afar, but each wire is glued down with ability to be replaced if need be or troubleshooted.

Here is the USS Excalibur upper saucer in all of it illuminated glory (captured on iPhone 6).


Happy Model Building my friends!!
All still images taken of the USS Enterprise from Star Trek are being used for educational use only. This blog does not claim rights of ownership over any images sourced from the internet.
Previous Build: USS Excalibur NCC-1664-A Update 1
No comments:
Post a Comment